Monday, 31 October 2011

Mermaid Art Doll project #6 - Possible breakthrough for her face


Now I haven't forgotten my mermaid doll but I have been struggling to get her face right. I have tried a load of the types of faces suggested by doll sites but I just can't seem to get the knack right. I am hoping that the next attempt will prove sucessful enough for me to finish her.


I have purchased a tube of Dylon image maker with the hope of sucessfully transfering a face design to fabric. I have used thE image on the right as I want to do her hair myself and last night I printed it out, lathered it in transfer fluid, placed it on the fabric and left it till this morning and am praying that it works.


I have nothad much sucess with this product before and if it doesn't work then I may have to go back to the freezer paper method.

Wednesday, 26 October 2011

Salamander on stone - Free machine embroidery

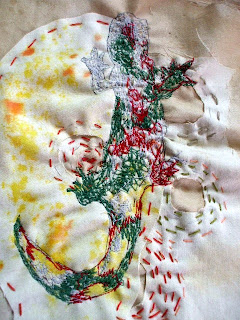
Having cracked the free machine stitch on my machine I have embroidered a beautiful, colourful salamander on the natural stained fabric collage.

This is my lizard simply drawn on the fabric


I started off with a dark olive green in a natural patern, covoured the rest of the fabric in grey and red but making sure I left enoughspace to show the natural colour of the tumeric dye.


Thursday, 20 October 2011

Mark Making Experiments - results and follow on- Salamander on stone


These are the results of the natural mark making that I was working on over the weekend


From the left #1 apple #2 tea #3 spices


I have cut out rough circles on the apple dyed fabric around the marks made by the fruit


I have layered the apple fabric onto the tea fabric so that the darker fabric so that the darker dye shows thru and contrasts with the lighter dye. The spice fabric has been cut into a pattern matching the marks of the dye and layered on top with a single opening to show the other layers.

I have now joined the pieces with hand stitching in red,yellow,grey and orange abnd it reminde me of some kind of fire creature, a salamander or fire lizard.


One of my birthday presents was a roll of fine copper sheeting suitable for machine and hand stitching so I will either cut out a lizard in the copper or machine stitch the creature on the fabric with black and red cotton and use the copper as flames.

Monday, 17 October 2011

Faces in Free Motion

I have managed to crack Free Motion embroidery on the sewing machine. I was playing about last night with faces and whilst they do look rather gargoyle like I think they show promise.


Sunday, 16 October 2011

Sweet Rustic Cinderella Patchwork Hessian Aprons

Sweetly Rustic Waist length aprons made with beautiful hessian fabric and embellished with red and yellow hessian patchwork pieces.
These aprons are both hardworking and practical but also make a stunning country style statement for all seasons.Perfect for apple picking, pumpkin carving, gingerbread baking, thanksgiving dinner or anything else you get up to in this beautiful autumn season.

Waist band and ties are made from mid brown linen tape and tie at the back

Full length and child aprons are also available although patchwork colours may vary.

Available on Etsy


Saturday, 15 October 2011

Mark Making Experiments


I have been indulging with a good book this afternoon. More specificly The Found Object in Textile Art and have been rather inspired by the mark making in the book to have a go with my own ideas over the w/e.


Rather traditional teabag printing/staining. I washed the fabric in water and white wine vinegar to help fix any patterns and kept it damp during the day.


This is apples pieces and green tomatoes. The fabric was treated in the same way. I expect a subtle yellow patterning on this fabric. Nothing strong but something beautiful and delicate.


From this I expect fiery colours and speckled designs. This is tumeric and chili powder from Morocco sprinkled onto damp fabric that is already settling into the cloth.


I shall be keeping the fabrics damp during the w/e and then leave to dry on Monday.

summerfaire: Snow White Apple Bag

summerfaire: Snow White Apple Bag: Okay, so that project I was telling you about? This is what it started out as: Just a few weird shapes drawn on cotton that somehow make...

I love this. Someone else using fairytales as inspiration for textiles

Friday, 14 October 2011

Seasonal Stockings and Jewellery for Things British

I am not going to say the dreaded C work just yet. I'm still now finished with Autumn but Things British need items to go in their holiday gift guide so I have spent the day making up samples of hangingstockings and my sister making some jewellery to send for consideration.


These are a few of the items


Willliam Morris Lilly Pattern Stocking with pink hand dyed lace top


Angel Chorus 100% cotton stocking.


Copper Stars and Glass chunky bracelet


Copper Holly and Green Marble Bracelet


Tuesday, 11 October 2011

Fingerless Gloves - In Progress Pics

Thes are my fingerless gloves part one


Knitted in stocking stitch with a 2x2 rib at both ends most of these will be decorated and embellished for my chosen themes


Untitled

Organic Turquoise cotton with lace thumbs and faceted black buttons


Lichen and Roses

Pale blue and white pure wool with hand stitched floral lace and vintage buttons


The Blackberry Thief


pink and black pure wool with hand pleated tea dyed lace strips,

upcycled flowers and brass effect flower beads


Goblin Girl is still in progress but she will be dark green and black with hand stamped copper, red rose braid and........

Monday, 10 October 2011

Etsy Treasuries

My entries for the Etsy Treasury Hunter Team Challenges

This Halloween I'm causing a Sensation!


The Harlequeen


Treasury featuring my Pale Knight Top

Saturday, 8 October 2011

Etsy Treasury Hunter: Treasury Challenge Winner ~LayOffTheBooks~ Week 18...

Etsy Treasury Hunter: Treasury Challenge Winner ~LayOffTheBooks~ Week 18...: Congrats LayOffTheBooks! Contest winners receive 1 week of free DELUXE advertising on ETH. Please remember to visit LayOffTheBooks' sho...

My treasury entry After the Ugly Bug Ball was given a honorable mention which I am delighted about. Thank You

Friday, 7 October 2011

Altered Eras: New Venture - THINGS BRITISH - Exciting New Shop i...

Altered Eras: New Venture - THINGS BRITISH - Exciting New Shop i...: *   *   *   *   *   *   *   *   *   *   *   *   *   *   *   *   *   *   *   *   *   *   *   * Altered Eras can now be found in a London s...

You can see my owls in the window at 0.24 and our shelf at 2.28

thank you Paula for posting this

Fingerless Gloves

Brrr its getting chilly right about now so I'm working on some plans for fingerless gloves.

The three I'm working on at the moment are titled

Blackberry Thief - pink and black with white roses and tea dyed muslin

Goblin Girl - green and black wih hand stamped metal, red rose ribbon, twigs and beads

Lichen and Roses - the old abandoned castle - blue and white with fawn floral lace, buttons, keys? embroidered lichen


Thats my day for today. I'll be adding pics to this post as the day goes on

Thursday, 6 October 2011

Treasury Features - Thank You!

A big thank you to everyone who has featured us in their treasuries this week


Wednesday, 5 October 2011

Monday, 3 October 2011

Fairytale Cowls - Cinderella in progress pics and inspiration


These pictures were my main inspiration for Cinderella, a dreamy creation in filet crochet with silk and lace, rags and tatters


Saturday, 1 October 2011

How To - Make an Art Quilt Style Mixed Media Canvas - Autumn Owl part three

This is the last part of my Autumn Owl Canvas.


I left you last time with simply the owl to make to finish it off


Here is what you will need for part three


1 Brown Fabric - felt or cotton are two good choices for your owl


2:Embroidery Cotton


3: Brown Felt


4: two small buttons for eyes


5:your template


6: a small amount of stuffing. I used pure wool but you could use anything that is soft.


Step one is to design your owl. I did a load of quick sketches but settled on this one


Step two is print out your template. You can use this one or design your own. The owl is approx 2" and a bit high.


Cut out your fabric


Pin to your canvas just above the branch


Using your embroidery thread stitch around 3/4 of the owl leaving a space at the bottom


Gently stuff your owl. I used the end of a paintbrush to stuff the ears


Stitch him all the way up


The next task is to embroider two small circles for his eyes


Add your button eyes and a small triangle for his beak. You can also add eyebrows and feather ears


Now for his tummy.


Embroider a zig zag stitch across the top of his tummy, just below his beak.


Now stitch at an angle from left to right using the zig zag dashes as a guide


Now stitch right to left to create across hatch diamond pattern


Now for his wings.


Cut the wings out of the same fabric (or different to create a unique breed )


Stitch them with an x stitch just at the sides


Now for his feet


Start by stitching a couple of stitches from the bottom of his body to the top of the branch


Now stitch three stitches each claw from the top of the branch into the cotton that is wrapped around the branch and into the canvas


Finished Claws


This is my finished Owl


One Finished Canvas


He is now ready to adorn your wall or wrap up and give as a present