Showing posts with label art owl. Show all posts

Saturday, 1 October 2011

How To - Make an Art Quilt Style Mixed Media Canvas - Autumn Owl part three

This is the last part of my Autumn Owl Canvas.


I left you last time with simply the owl to make to finish it off


Here is what you will need for part three


1 Brown Fabric - felt or cotton are two good choices for your owl


2:Embroidery Cotton


3: Brown Felt


4: two small buttons for eyes


5:your template


6: a small amount of stuffing. I used pure wool but you could use anything that is soft.


Step one is to design your owl. I did a load of quick sketches but settled on this one


Step two is print out your template. You can use this one or design your own. The owl is approx 2" and a bit high.


Cut out your fabric


Pin to your canvas just above the branch


Using your embroidery thread stitch around 3/4 of the owl leaving a space at the bottom


Gently stuff your owl. I used the end of a paintbrush to stuff the ears
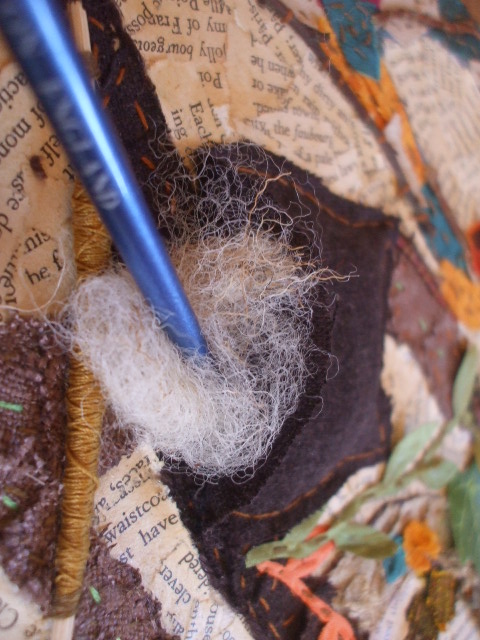


Stitch him all the way up


The next task is to embroider two small circles for his eyes


Add your button eyes and a small triangle for his beak. You can also add eyebrows and feather ears


Now for his tummy.


Embroider a zig zag stitch across the top of his tummy, just below his beak.


Now stitch at an angle from left to right using the zig zag dashes as a guide


Now stitch right to left to create across hatch diamond pattern


Now for his wings.


Cut the wings out of the same fabric (or different to create a unique breed )


Stitch them with an x stitch just at the sides


Now for his feet


Start by stitching a couple of stitches from the bottom of his body to the top of the branch


Now stitch three stitches each claw from the top of the branch into the cotton that is wrapped around the branch and into the canvas


Finished Claws


This is my finished Owl


One Finished Canvas


He is now ready to adorn your wall or wrap up and give as a present


Sunday, 25 September 2011

How To - Make an Art Quilt Style Mixed Media Canvas - Autumn Owl part 2

Welcome to Part Two of my Autumn Owl tutorial.

Last time I had finished appliqueing the trees and had done some decoration/embelishment on the branches give a helping hand when starting to decorate it.
This time I'll be filling out the background of the trees and doing some more embelishment on the branches


Things you will need for part 2


1: PVA or craft glue


2: paintbush


3: an old book or decorative paper


4: embroidery threads


5: leaf ribbon, fabric leaves, more twigs and small metal flower spacer beads


This is where I left the canvas last time


Step one is concerned with using your paper to create a background.


I'm using an old penguin book with beautiful yellowing pages that was falling to bits with a broken spine. You can use any type of paper you want from newspaper, handmade paper to tissue paper and coloured paper but I am using book print as our subject is an Owl and they are the creatures of wisdom and learning so a written background is very fitting


You will need to tear your paper into small pieces the sme size as your fabric scraps and gently paint them to the white canvas with your glue and leave to dry for about an hour and a half


For the next step you will need fabric leaves and ribbon. I simply cut my leaves from a leaf print fabric. You could do the same with a floral fabric if you don't fancy leaves or simply cut out leaf shapes from any fabric you have in your stash


Cut out your leaves and cut the ribbon into 3 - 4" lengths and stitch into your branches wherever looks right. Remember to leave space for your owl!


Now stitch on your flower beads. You can also add red or purple beads in clusters for autumn berries


The last thing in part two in to make a perch for your Owl


You will need a preferably bent twig or piece or chair cane approx 3" long. You need to wrap it in either cotton, thread or a light fabric and stitch it onto the canvas in the botton quarter of the piece.


This is what you should have after this session. With your own twist of course


Next time I will be making my Owl and giving options for other techniques for your feature creature

Saturday, 24 September 2011

How To - Make an Art Quilt Style Mixed Media Canvas - Autumn Owl part one

This is my first ever How To for my blog and its series on how to make a decorative canvas for your wall.


For this you will need


for part one


1: a canvas


2:embroidery thread and thin yarn in natural shades such as green, brown, purple,yellow and orange


3: sewing needles


4: scaps of fabric. You will only need small pieces as no branch piece needs to be bigger then one inch


5:twigs, fabric leaves, flowers,acorn caps, nature ephemera


6: anything else that is small, decorative and takes your fancy.


Step one is to unwrap your canvas. I'm using an 18 by 24cm one.


Step 2 is to tea stain your canvas. I dislike white surfaces and its always nice to start with something that gives you the feel of your surface. Leave it to dry and you can now think about your design.


I started by drawing a simple tree branch design in paint on my computer and transfered it to my canvas. You can either draw in from the screen or print it out and use tracing paper to copy your design.


Once you have your image on your canvas you can then start embroidering your outlines. For this I used embroidery threads in yellow and green, some dark purply/grey handpainted silk yarn and brown knitting yarn. A mix of textures as in nature.


When you have finished your outlines this is what you should have


Now is the exciting bit.


The next step is filling out your tree branches. You will need you fabric scraps and more embroidery cotton


You need to cut each piece of fabric roughly to the size you need as you stitch it. For the multi coloured branch each piece is around half the width of the space and I have used large raw stitches to add to the organic nature of the piece


This branch is a mixture of suede,silk,cotton,curtain fabric and acid etched damask.


Once you have finished you branch I suggest you add a couple of small twigs by oversewing them onto the already stitched canvas to give you a feel of how you are progressing


The second and third branches I have used the same technique but have used a single fabric one a pale fawn/grey linen and the other a green gold loose woven heavier fabric


The wonderfull thing about this is that you don't need to finish one layer before starting on another. I have already suggested the adding of small twigs and now on the other branches I have added french knots and small circles of yellow and green fabric to represent lichen on the plainer branches along with some fabric ivy leaves


You will need to fill in the other branches in the same manner using whatever fabric you wish but not making any single piece bigger then one inch.


Remember to leave to botton horizontal branch free of embelishment as that is where you will put the owl.


Next post will be filling in the background